

Quick Answer: To fix a water softener O ring leak, first find exactly where the water comes out, because that tells you which O-ring failed: the bypass, an installation fitting, the valve-to-tank joint, a cap on the valve or the drain fitting. Put the softener in bypass, shut off the water and relieve pressure, then remove the part and fit a new O-ring of the exact same size. Coat it lightly with 100% silicone grease such as Molykote 111. Never use petroleum jelly or oil; both softener makers warn that hydrocarbons damage O-rings and plastic.
Disclosure: As an Amazon Associate, Grains & Gallons earns from qualifying purchases.
A water softener O ring leak rarely starts as a gush. It starts as a slow weep, a crust of white mineral at a joint, maybe a drip that only shows up overnight when pressure peaks or during a regeneration. The good news is that O-rings are cheap and most of them are easy to reach. The hard part is knowing which one you're dealing with, because a typical softener has quite a few.
This guide shows you how to pin the leak on the right O-ring, rule out the look-alikes, replace it without damaging the groove, and deal with the bigger valve-to-tank job if that's where the water is coming from.
In this guide
Why softener O-rings start to leak

An O-ring seals by being squeezed in its groove and pushing back against the surface it meets. It stops sealing when it can't push back any more. On a softener that usually happens one of four ways:
- Compression set. After years squeezed in one position, the rubber goes flat on one side, hardens and loses its spring. This is the classic slow weep on an older valve.
- A nick or cut. O-rings get damaged when they're pushed over sharp threads, scraped by a screwdriver, or pinched when a part goes in at an angle. These often leak from the day of a repair.
- Chemical attack. Pentair's 5600SXT manual warns that plastic parts and O-rings can be damaged by heat and solvents, and Clack says hydrocarbons "will damage components that contain o-rings and/or plastic. This can cause leaks or breakage." Petroleum jelly, WD-40 and pipe dope near an O-ring all count.
- Movement and strain. Clack notes its valve, fittings and bypass tolerate minor plumbing misalignment but aren't designed to support the weight of the system or the plumbing. Pipes that pull on the bypass slowly distort the joint until an O-ring lets go.
Pressure plays a part too, which is covered further down. If you replace an O-ring and the same joint leaks again within months, one of these causes is still there.
Match the wet spot to the O-ring
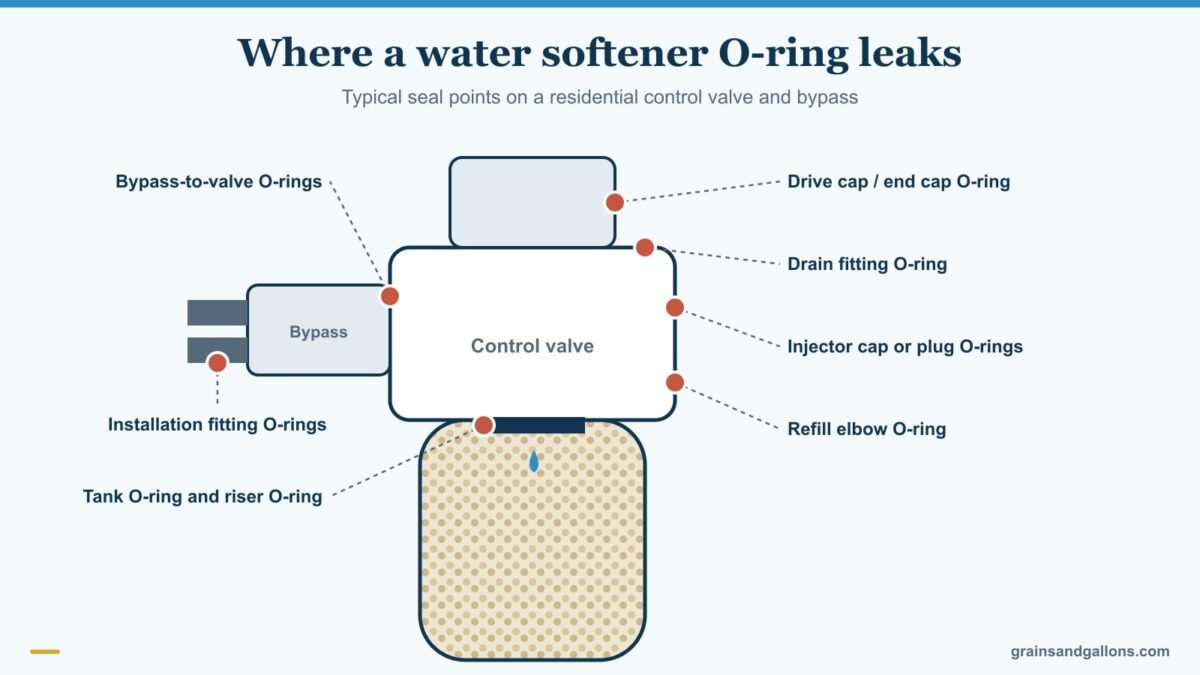
These are the usual suspects on a residential valve like a Fleck 5600SXT or Clack WS1. Clack's WS1 drawings and service manual puts O-rings at the drive cap, the distributor tube, the injector cap and injector plug, the refill elbow, the drain line retainer, the installation fittings and the bypass. Fleck valves have their own set in similar places, including the brine valve, injector body and meter.
| Where you see water | O-ring(s) likely at fault | How hard to replace |
|---|---|---|
| Around a bypass handle or knob stem | Bypass handle or rotor O-rings | Easy |
| Where the bypass or yoke plugs into the valve | Bypass or adapter O-rings | Easy |
| Where your pipes or connectors join the bypass | Installation fitting O-rings (or a bad threaded joint) | Easy |
| Seeping around the joint between valve and tank, or down the side of the tank | Tank O-ring and distributor (riser) tube O-ring | Moderate: valve must come off the tank |
| Around a small cap or plug on the valve body | Injector cap or plug O-rings | Easy |
| At the brine line or refill elbow | Refill elbow O-ring | Easy |
| At the drain fitting | Drain retainer O-ring or fitting threads | Easy |
| From the top of the valve, around the piston or end cap | Drive cap or end cap O-ring; may be internal seals | Moderate |
Use paper towel to find a slow weep
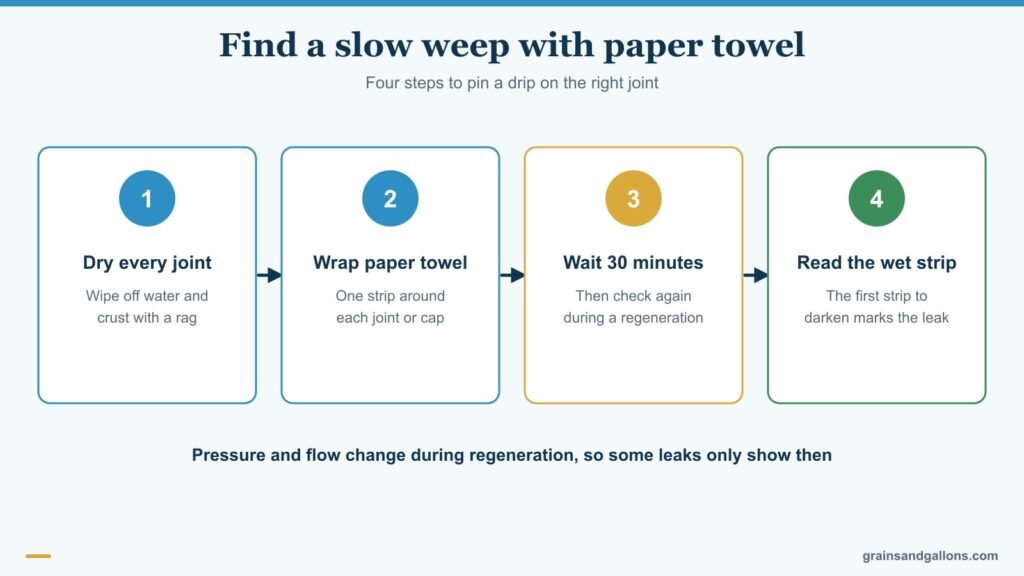
Water runs downhill and hides its source. A drip at the bottom of the bypass may be coming from an injector cap six inches higher. Dry every joint, wrap a strip of paper towel around each one, and come back in half an hour. The first strip to darken marks the leak. If nothing shows, check again during a regeneration: flows and pressures shift through each cycle, and some joints only weep then. Our guide to a softener leaking during regeneration only covers those cases.
If the water is collecting on top of the valve, see water softener leaking from top. If it's pooling at the base of the tanks, start with water softener leaking from bottom instead.
Not every leak at a joint is an O-ring
Before you order parts, rule these out:
- Cracked plastic. A hairline crack in a bypass body, yoke or drain elbow leaks right next to an O-ring and looks just like one. Clean the crust off and inspect with a flashlight. If it's cracked, replace the part. Our best water softener bypass valves covers replacements for common valve families.
- Threaded pipe joints. A leak at a male-thread connection needs new tape, not an O-ring. Clack calls for Teflon tape on threaded inlet, outlet and drain fittings, but says tape isn't needed on the nut connections or caps because those seal with O-rings.
- A push-fit or crimp connection. If the drip is at the pipe side of the installation fitting, the problem may be the pipe joint itself. Our guide to a softener PEX connection leak covers those.
- Internal seals. Water coming out around the piston rod or the top of a Fleck valve can be the seal and spacer stack inside, which is a bigger job. See servicing a water softener control valve.
One more trap: don't just crank the nut tighter. Clack's manual is blunt about it: if an installation fitting leaks, "tightening the nut will not stop the leak." The fix is to take the fitting apart and check the O-ring for damage or misalignment. Overtightening plastic nuts can also crack them.
Water softener O ring leak repair, step by step
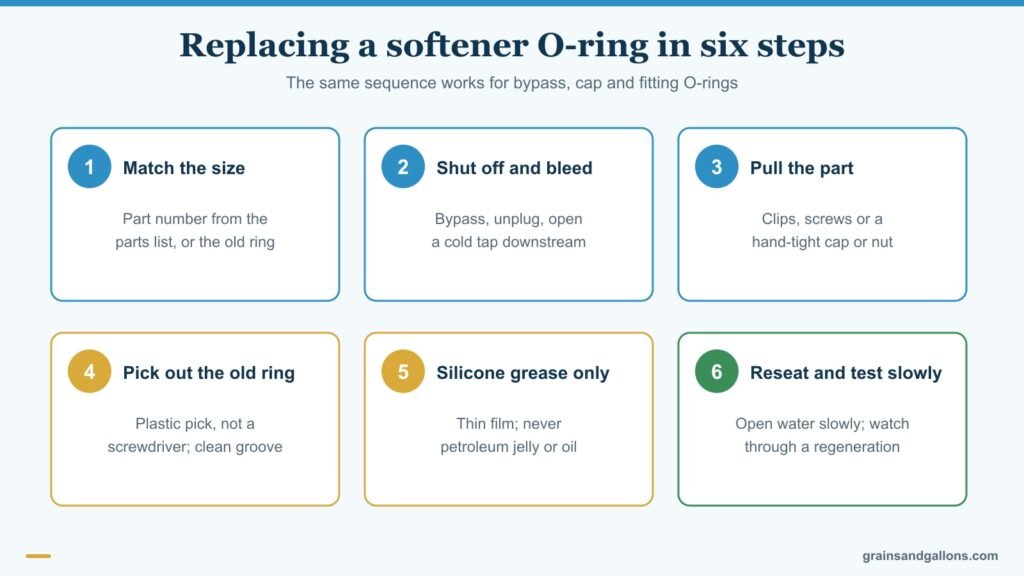
For a leak that's clearly at the bypass, our bypass valve leaking guide goes deeper on that one part. For everything else, the process is the same.
1. Get the right size before you start
Match by part number from your valve's parts list in the manual, or take the old O-ring to a supply house. O-rings are sized by inside diameter and cross-section thickness, and "close" isn't close enough. Valve makers sell O-ring kits for the bypass or the whole valve, which saves guessing.
2. Shut down and depressurize
Put the softener in bypass and unplug it. Close the main shutoff if you're working on the bypass or the plumbing connections, since bypass mode doesn't isolate those. Open a cold tap downstream to bleed pressure, and keep a towel and a shallow pan under the valve. Some water will come out even with everything shut.
3. Pull the part
Bypass valves usually come off after you remove a couple of clips or retaining screws. Caps and nuts unscrew. Clack designs its caps and nuts to be hand-tightened, and warns against using a pipe wrench or tapping a screwdriver in the cap slots. The valve-to-tank joint is the exception: you have to unscrew the whole control valve from the tank. If that's your leak, read the next section first.
4. Remove the old O-ring without scratching the groove
Use a plastic pick or a wooden toothpick. A metal screwdriver scratches the groove, and a scratched groove leaks no matter how good the new O-ring is. Wipe out grit, scale and old grease, and look at the old ring: flat sides point to age, a cut points to installation damage, and a soft or swollen ring points to the wrong lubricant.
5. Grease lightly with silicone, then seat it
Coat the new O-ring with a thin film of silicone grease. Both manuals say silicone only. Pentair warns that non-silicone grease can make plastic parts fail over time and says to use only 100% silicone lubricants. Clack bans Vaseline, oils, other hydrocarbon lubricants and spray silicone, and notes that silicone grease is optional on its black O-rings. The grease mostly helps the ring slide in without rolling or pinching.
Roll the O-ring into its groove rather than stretching it over sharp threads. If you have to pass threads, cover them with a bit of tape first. On Clack installation fittings, the order matters: nut first, then the split ring, then the O-ring last.
6. Reassemble and check under pressure
Push the part straight in without twisting it at an angle, and reinstall the clips. Open the main slowly, then take the softener out of bypass slowly. Pentair recommends rotating the bypass handles two or three times before turning the water on to help seat the O-rings and prevent leaks. Watch the joint for a few minutes, then again during the next regeneration.
The valve-to-tank O-ring is a bigger job
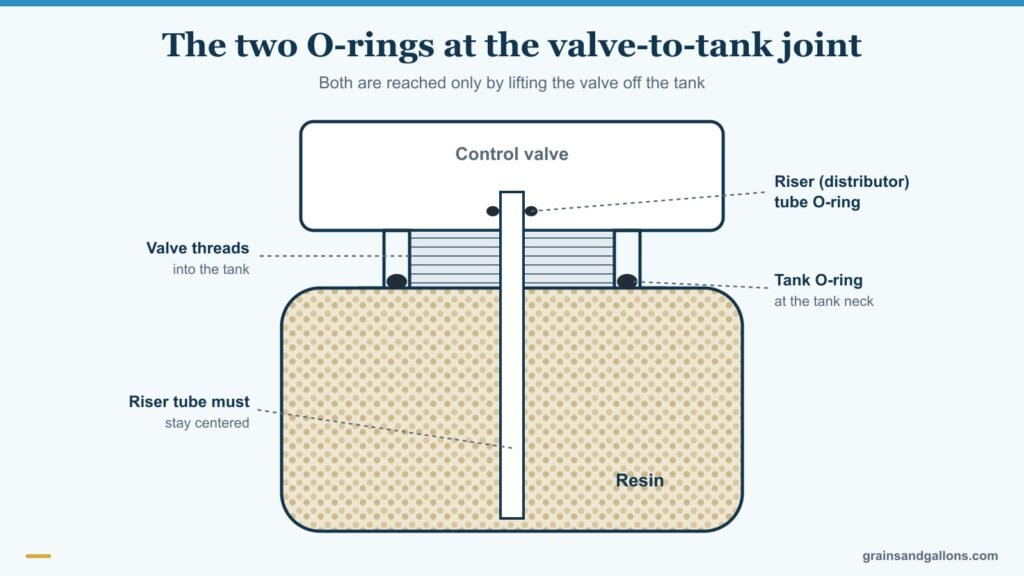
When water seeps from the joint between the control valve and the mineral tank, the culprits are the large tank O-ring at the tank neck and the smaller O-ring where the distributor tube enters the valve. Pentair's troubleshooting table lists "leak at distributor tube" and says to make sure the tube isn't cracked and to check the O-ring and tube pilot.
To get at them, the softener has to be disconnected from the plumbing and the valve unscrewed from the tank. They can be tight, and you must not crack the tank threads. Keep the riser tube centered and cover its top so resin doesn't spill into it. When the valve goes back on, the riser has to slide into its O-ring cleanly; forcing it can cut the O-ring or crack the tube. If you find a cracked riser while you're in there, our guide to a broken riser tube covers the symptoms and what to replace.
This job is where most DIY repairs go wrong, mainly because the valve is awkward to lift and the riser is easy to knock off-center. If you're not comfortable with it, it's a reasonable job to hand to a water treatment tech.
Rule out high pressure when O-rings keep failing
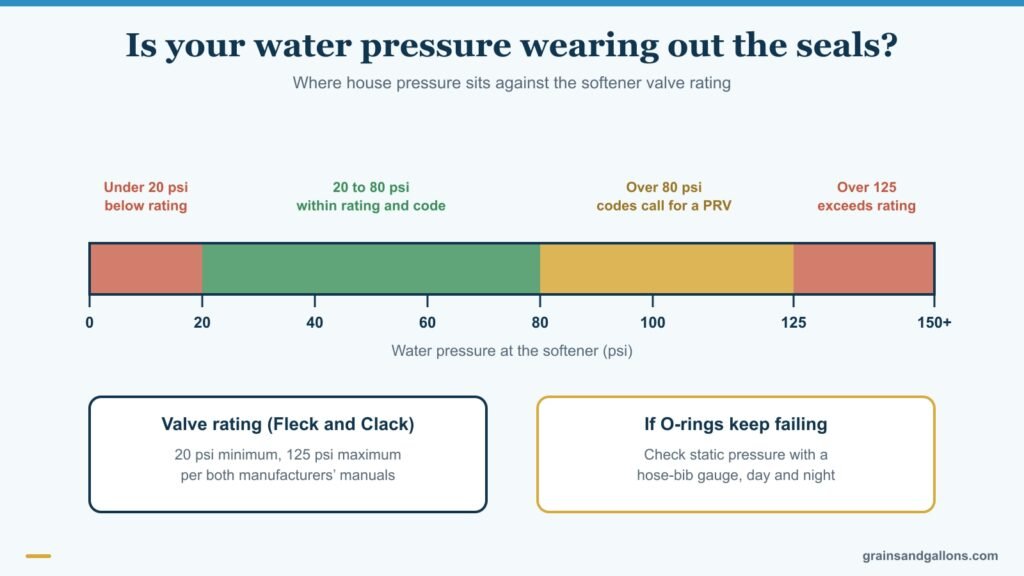
If you keep replacing O-rings at different joints, check the water pressure before you buy another kit. Both manuals rate their valves for a working range: Pentair says water pressure must be below 125 psi and above 20 psi, and Clack lists 20 psi minimum and 125 psi maximum. Many plumbing codes also call for a pressure-reducing valve when house pressure is above 80 psi.
A hose-bib pressure gauge from a hardware store answers the question in a minute. Check it during the day and again late at night, when pressure can run higher because demand is low. If it reads high, a pressure-reducing valve on the main protects the softener and every other fixture in the house. If you already have one and the pressure has crept up, the reducing valve itself may be failing.
Find the wet joint first, then use silicone only
Most water softener O ring leak repairs are a 20-minute job: find the wet joint with paper towel, rule out cracked plastic and threaded joints, then fit an exact-size O-ring with a thin film of silicone grease and bring the pressure back slowly. The valve-to-tank joint takes more care, and repeated failures point to pressure or pipe strain rather than bad luck.
If you're chasing leaks at several joints on an old valve with brittle, yellowed plastic, a new head may make more sense than piecemeal repairs. Our guide to replacement water softener control valves covers Fleck and Clack heads that fit standard tank threads. Call a pro if water is near electrical outlets or you aren't comfortable lifting the valve off the tank.
FAQ
Can I use Vaseline or plumber's grease on softener O-rings?
No. Pentair's 5600SXT manual says not to use petroleum-based lubricants such as Vaseline, oils or hydrocarbon lubricants, and to use only 100% silicone. Clack's manual says hydrocarbons damage parts with O-rings or plastic and can cause leaks or breakage. Use a pure silicone grease and check the label before you buy.
Will tightening the nut stop an O-ring leak?
Usually not. The O-ring does the sealing, not the nut. Clack's manual says that if an installation fitting leaks, tightening the nut will not stop it; you need to take it apart and check the O-ring for damage or misalignment. Overtightening plastic nuts can also crack them and create a new leak.
How long do water softener O-rings last?
There's no fixed lifespan. O-rings that stay put and are never disturbed can last many years, while ones that are moved often, like bypass handle O-rings, or that sit in high-pressure or chlorinated water wear out sooner. Replace any O-ring you disturb during a repair rather than reusing it.
Do I need to replace all the O-rings at once?
Not necessarily. Replace the one that's leaking and any others you have to remove to reach it. If the valve is old and you're seeing weeps at several joints, a full O-ring kit for the bypass or valve is cheap insurance, since the others are likely the same age.
Is a dripping bypass valve always an O-ring problem?
Not always. A cracked bypass body or a leaking threaded pipe joint can look exactly like a failed O-ring. Clean the area, dry it, and inspect with a flashlight. If the plastic is cracked, the whole bypass needs replacing; if the drip is at male threads, it needs new tape.