

Quick Answer: Buy the float made for your valve. On a Fleck control (5600SXT, 7000SXT, 2510SXT), the genuine Fleck 2310 safety valve (60014) drops right in. On a Clack WS1, use Clack's quick-connect float kit. If the brine well is cracked or missing too, the Kelmado 2310 kit with brine well replaces both in one go. Before ordering any of them, make sure the float is actually what failed.
Disclosure: As an Amazon Associate, Grains & Gallons earns from qualifying purchases.
Most people shopping for a brine float are standing over a brine tank that's half full of water when it should hold a few inches. The float is a reasonable suspect, but it's often not the cause. On most modern metered softeners, the safety float isn't what controls how much water goes into the tank. The control valve meters the refill by time. The float is a backup that shuts the brine line if the valve overfills. When the tank floods, the float usually failed to catch a problem that started elsewhere: a stuck valve, a plugged injector, or a drain line flow control that's blocked.
So a new float stops the overflow, but it may not fix why it's happening. Replace it anyway if it's stuck or cracked, but keep troubleshooting. Our brine tank overflowing guide walks through the full list of causes.
In this guide
Five-minute check before you buy
Lift the lid and pull the brine well cap.
- Float rod slides freely and the float isn't waterlogged? The float is probably fine. Look at the valve and injector instead.
- Float caked in salt, or the rod won't move? Clean it in warm water first. A salt-crusted float often works again once it's rinsed.
- Float cracked, filled with water, or the rod broken? Replace the float and rod. You may not need the whole assembly.
- Brine well cracked or the cap is gone? Salt gets into the well and jams the float. Replace the well along with the float.
- Tank stays bone-dry? That's a different fault, usually a closed float, a blocked line or a refill problem. See no water in the brine tank.
What the float actually does during a regeneration
It helps to picture the cycle, because that's how you know whether a new float will fix your problem.
- Brine draw. The control valve's injector pulls brine out of the tank through the brine line. The water level drops, and the float drops with it.
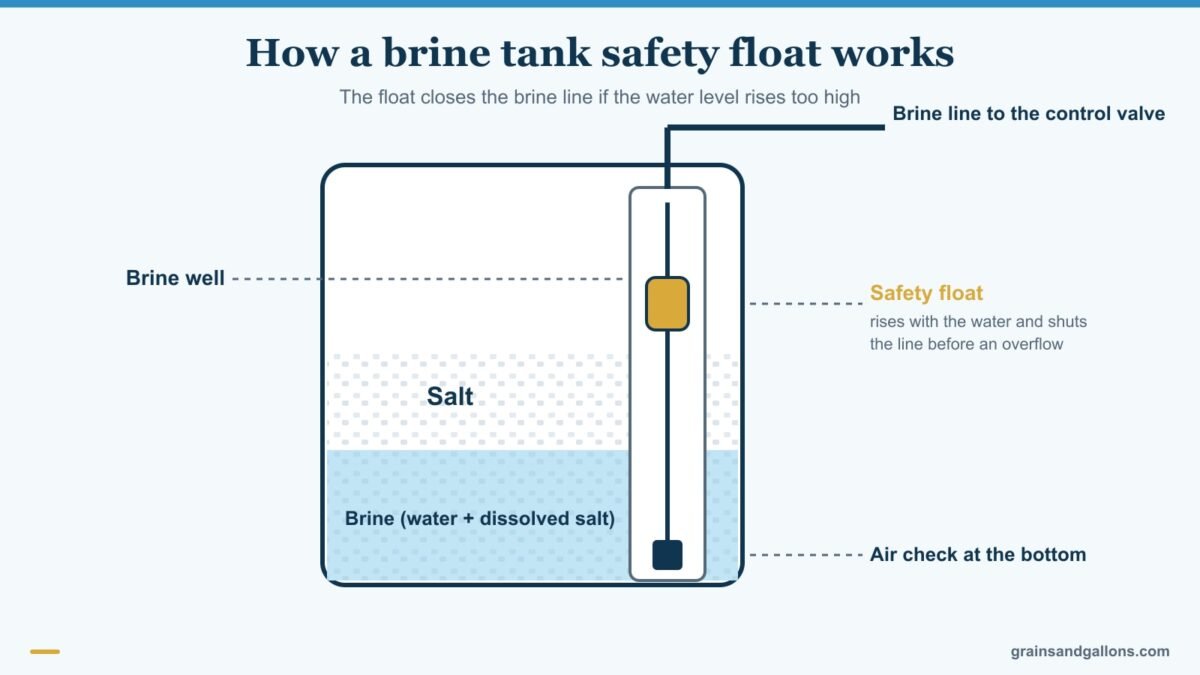
- Air check closes. When the tank is nearly empty, the air check (a small ball valve at the bottom of the assembly) seats so the valve doesn't suck air into the resin tank.
- Refill. The valve sends fresh water back down the brine line for a set time, or a set volume on newer meters. Water rises in the tank to dissolve salt for the next cycle.
- Safety shutoff. If the refill runs too long, because the valve stuck, the timer misfired, or the power blinked mid-cycle, the rising float lifts the shutoff and blocks the line. The tank can't keep filling.
So if your tank floods, step 4 failed and something upstream went wrong. If your tank stays dry or the softener stops drawing brine, the problem is often step 1 or 2. That can mean a blocked injector, a stuck air check, or a float stuck in the closed position. Look at what you're actually seeing before you order parts.
Mistakes that make a new float fail
- Setting it too low. If the shutoff point sits below the normal refill level, the float cuts off every refill early. The softener makes weak brine and hardness slips through. Set the shutoff a few inches above the normal refill height.
- Skipping the brine well cap. Without the cap, salt pellets fall into the well, pack around the rod, and the float can't move.
- Cutting the brine line short. The line needs a little slack so the assembly can sit straight in the well. A taut line pulls it sideways, and the float rubs against the wall.
- Mixing fitting styles. A 3/8" compression nut on a quick-connect fitting, or the other way around, leaks air, and an air leak in the brine line stops brine draw.
- Not cleaning the tank. If the tank bottom is sludge, a new float sits in the same mess. Empty and rinse the tank when you swap the float.
Fit is everything
Three measurements decide whether a replacement works:
- Brine line size. Most residential softeners use 3/8" OD tubing to the brine valve. Larger commercial units may use 1/2". Check the tubing, not the manual.
- Brine well height. The assembly has to stand in the well with the float riding at a sensible shutoff height. A 36" rod in a 30" well doesn't work. Measure from the tank floor to the top of the well.
- Valve brand. Fleck's 2310 and Clack's float kit both do the same job, but their fittings and air-check designs differ. Mixing them can work with adapters, but there's no reason to make it harder.
If you need a refresher on what's inside the tank and what each part does, our brine tank internals guide labels everything.
Five floats that fit real softeners
| Float | Fits | Includes | Choose it when |
|---|---|---|---|
| Fleck 2310 (60014) | Fleck valves, 3/8" line | Safety valve + float assembly | You have a Fleck and the whole assembly is suspect |
| Clack QC float kit, large | Clack valves, tanks up to 40" | Quick-connect float kit | You have a Clack WS1 |
| Kelmado 2310 + brine well | Fleck & Clack, 3/8" | Float assembly + brine well | The well is cracked or missing |
| Fleck 60068-30 float & rod | Existing 2310 valves | Float + 30" rod only | Only the float or rod is damaged |
| Kelmado 24" float | Fleck/Clack/Culligan-style, 3/8" QC | Short float assembly | Short brine tanks (e.g., 14" x 34") |
Fleck 2310 safety brine valve (60014)
The 2310 is the standard safety brine valve under most Fleck-valved softeners, including many sold online under brands like AFWFilters. Going genuine means the fittings match your existing 3/8" brine tubing and the float height lines up with the well your tank came with. This is the one to buy if you can't tell what's wrong inside the assembly, or if it's the original part on a softener older than ten years.
The downside is that you're replacing parts that may still be fine, like the valve body and the tube. If only the float is bad, the 60068 below costs less to fix it.
Clack quick-connect float kit, large
Clack's own kit for its valves, sized for tanks up to 40" tall. The quick-connect fitting snaps onto the brine line without a compression nut, so it's the easiest swap on this list. If your softener has a Clack WS1 head (the valve cover says Clack), use this one and skip the generic 2310 types.
Watch the size. Clack sells this kit in more than one length, and "large" is for taller brine tanks. A short tank needs the smaller kit.
Kelmado 2310 assembly with brine well
This is an aftermarket 2310-style float that comes with a new brine well, and it's listed as compatible with both Fleck and Clack using a 3/8" line. It's the practical buy when the old well is cracked, the cap is gone, or the well got packed with salt. A clean well matters as much as the float, because a well full of salt mush will jam any float you put in it.
The trade-off: Kelmado is an aftermarket brand, not the valve maker. Fit is usually fine, but before you cut the well to length, confirm its height against your tank and measure twice.
Fleck 60068-30 float and rod
This is just the float and a 30" rod for an existing 2310 valve. If the float cracked and filled with water, or the rod snapped while you were digging out a salt bridge, this is the cheapest correct fix. You keep the valve and tubing that still work.
It won't help if the 2310 valve body itself isn't sealing. For that, buy the full 60014 assembly.
Kelmado 24" safety float
A shorter 2310/60014-style replacement with a 3/8" quick connect, listed for tanks like 14" x 34" and 18" x 36". Compact and cabinet-style softeners use lower brine wells, and a full-height assembly simply won't fit. This one is sized for them.
As with any aftermarket part, check the listing's compatibility notes against your valve before ordering.
After the swap
Run a manual regeneration and watch the refill. The water level should end a few inches above the salt grid or the tank floor, depending on your setup. It shouldn't climb toward the overflow. If it keeps rising until the new float shuts it off, the float is doing its job and the actual fault is upstream. Look at the valve, the injector and the drain flow control. Our guide to a float that sticks up or down covers what's left to check.
Also make sure the brine tank's overflow elbow drains to a proper drain by gravity. The float is the first line of defense, and the overflow is the second. Our overflow line requirements guide explains how to route it.