

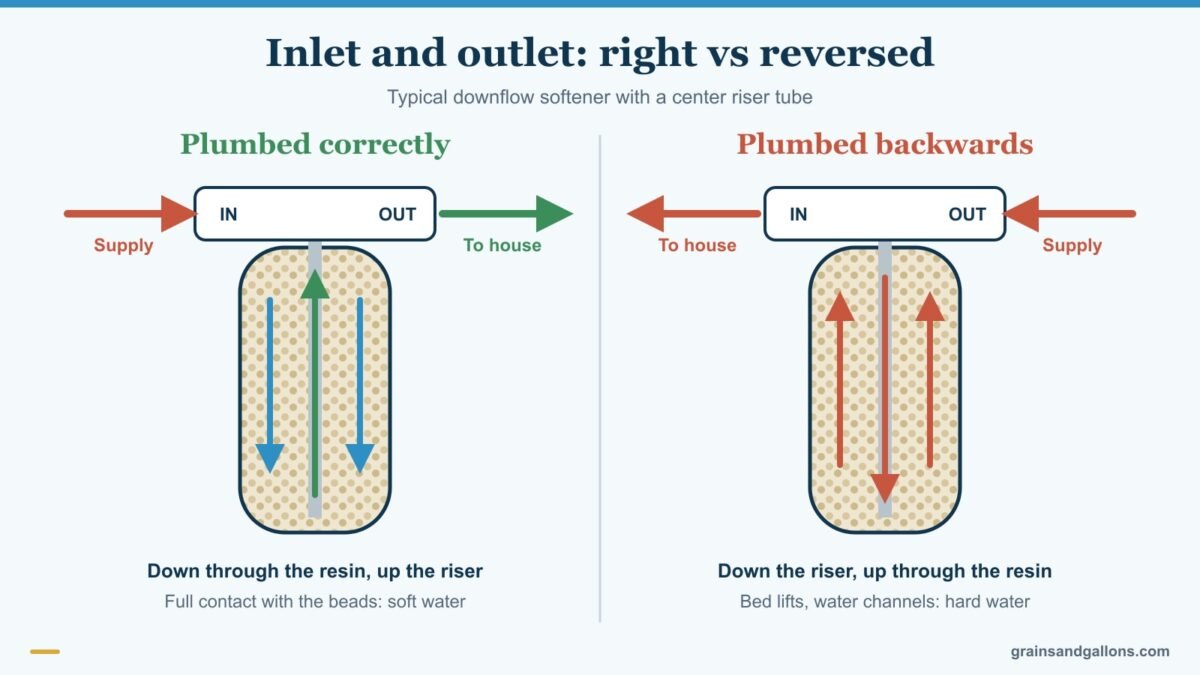
Quick Answer: A water softener plumbed backwards has the house supply connected to the outlet port, so water runs the wrong way through the resin. Look for the arrows or "IN"/"OUT" markings on the control valve or bypass, then trace the pipe coming from your water meter or well pressure tank. That pipe must reach the inlet. If it reaches the outlet, put the unit in bypass, shut off the water, swap the two connections, then run the startup procedure and a full regeneration.
A water softener plumbed backwards is one of the first things to rule out when a new install leaves the water hard, the pressure a little off, and the first regeneration acting strangely. Before you blame the resin or the settings, check the simplest thing: is the water going in the front door?
It happens more than you'd think. Many basements have the main coming in from the right side, many valves expect it from the left, and the replacement softener got hooked up the way the old one was. Pentair even warns about this in its Fleck 5600SXT installation manual: when you replace an existing valve, the inlet and outlet plumbing may already be reversed, so make sure the inlet connection is tied to the incoming supply instead of copying what was there.
In this guide
Signs your water softener is plumbed backwards
In most downflow softeners, water should enter at the top, pass down through the resin and leave through the riser tube in the middle. Reversed, it goes down the riser and up through the bed, then out the top. The valve is built around one direction, so several things go wrong at once.
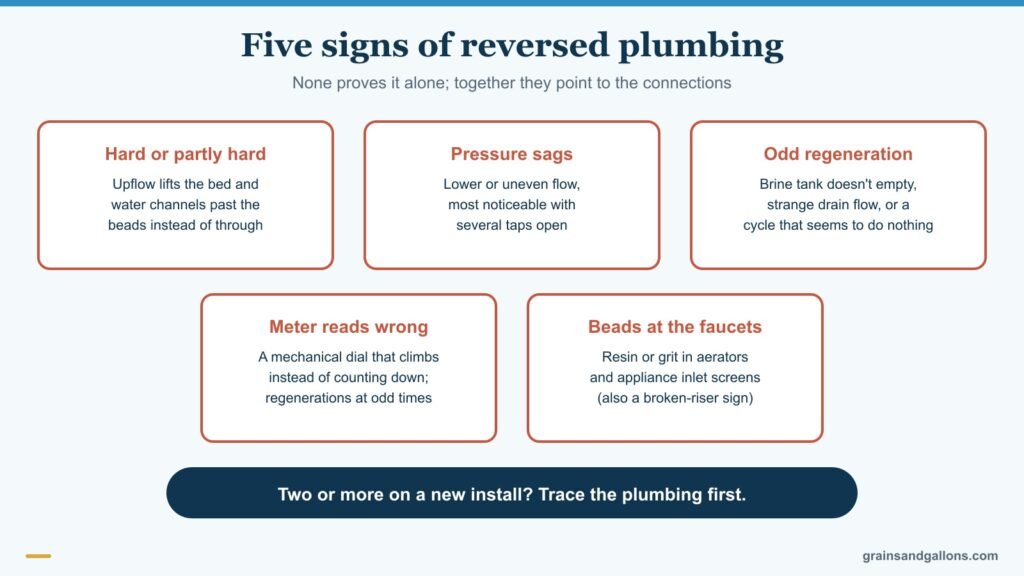
- Water stays partly or fully hard. Upward flow lifts and loosens the resin bed, so water takes shortcuts instead of making full contact with the beads.
- Lower pressure or uneven flow, especially when several taps are running.
- Regeneration doesn't work properly. The valve expects supply pressure at its inlet port, so backwash, brine draw and refill don't happen the way they should. You might see a brine tank that doesn't empty, odd drain flow, or a cycle that seems to do nothing.
- The meter counts wrong. On older valves with a mechanical gallon dial, a dial that climbs instead of counting down is a strong hint that flow is reversed. Electronic meters may still count normally when reversed, so a normal display doesn't clear the plumbing. Either way, a demand-initiated softener can end up regenerating at the wrong times. (If the meter shows nothing at all, see water softener meter not counting.)
- Resin beads in faucet aerators. Usually that points to a broken distributor or riser, but reversed flow can push beads out of the tank and into the service line.
None of these alone proves it's backwards. Hard water after a new install has plenty of other causes, which our water softener not softening guide covers. But if two or three show up together on a fresh install, the five-minute check below comes first.
Trace the supply pipe to the inlet port

You don't need tools for this, just a flashlight.
- Find the markings on the softener. Most control valves or bypass valves are marked. Clack engraves flow arrows on the valve body, and its WS1 service manual says the red arrow-shaped bypass handles identify the flow direction and should point the same way as those arrows. Fleck's manual labels the inlet, outlet, drain and brine ports. Cabinet softeners often have "IN" and "OUT" molded near the connections, or arrows on the bypass.
- Find where your water comes in. On city water, follow the pipe back from the water meter. On a well, follow it back from the pressure tank and any filters. That pipe carries untreated supply water.
- Trace that pipe to the softener. It should reach the inlet side. If it reaches the outlet side, the softener is backwards.
- Double-check with the water heater. The pipe from the softener's outlet should lead toward the house, including the water heater's cold inlet. If the "outlet" pipe heads back toward the meter, you've confirmed it.
If the pipes disappear into a wall or ceiling, look at which side of the wall the meter or pressure tank sits on, check for flow arrows a plumber may have drawn on the pipe, or ask the installer for the layout.
One trap: a Clack bypass's handles can be pulled off and put back 180 degrees out, so on that style the handles alone don't prove the direction. Go by the arrows engraved on the valve body.
Did running in reverse damage the resin?
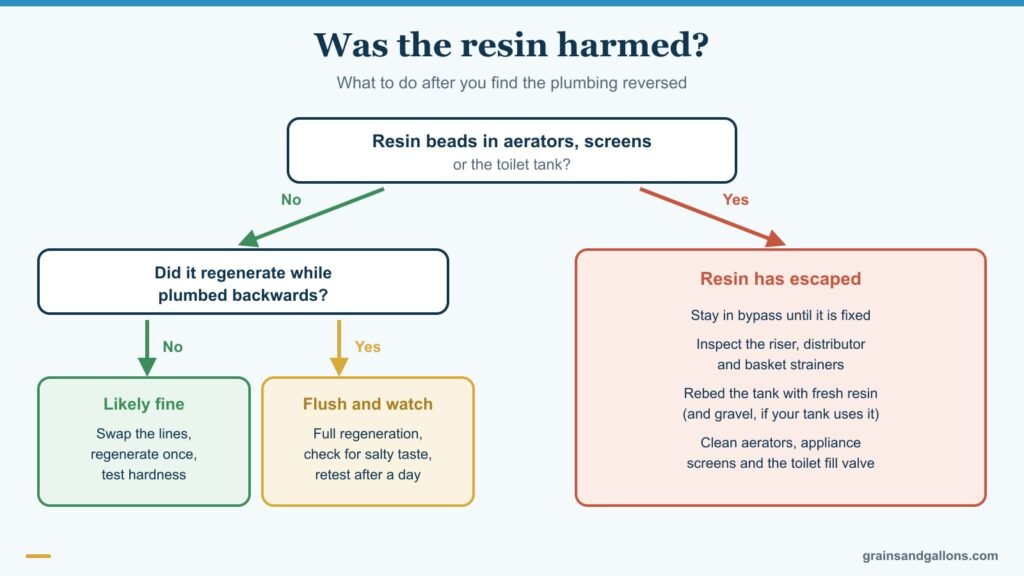
Usually not, if you catch it early. The tank's distributor and basket strainers are there to hold the beads in, and if they're intact, a short run in the wrong direction rarely sends resin anywhere. What matters is what happened while it was reversed:
- No regeneration yet and no beads at the taps: swap the plumbing, run one regeneration, and test the water.
- It regenerated while reversed: the brine may not have rinsed out the way it should. Run a complete regeneration after the swap, taste a cold tap for saltiness, and retest a day later. Water that keeps tasting salty means something is still wrong.
- Beads in aerators, appliance screens or the toilet tank: resin has escaped. Keep the softener in bypass, open the tank, and inspect the riser, distributor and strainers. A tank that lost a lot of resin needs rebedding; our guide to loading resin into a softener tank covers it, including the gravel layer some tanks use.
Swapping the inlet and outlet connections
1. Shut down
Put the softener in bypass, unplug it, close the main, and open a cold tap at the lowest point in the house to drain the pressure. Keep towels and a bucket nearby. The pipes will still have water in them.
2. Decide where to make the swap
- Swap at the softener. If the softener is connected with flexible lines, you can often cross the connectors over so the supply line goes to the inlet. Make sure they aren't kinked or stretched tight. If your connectors are too short to reach, longer braided or corrugated stainless lines solve it. Our roundup of flexible connectors for water softeners covers lengths and end fittings.
- Re-pipe the loop. With rigid copper, PEX or PVC, the two pipes have to be cut and rerouted so they cross. That takes more fittings and some skill with your piping material. Our installation kits guide covers kits that include the connectors and fittings for a clean re-pipe.
Don't try to fix it by turning the bypass around. A bypass valve is also directional, and flipping it usually puts its own markings out of agreement with the valve.
3. Seal and check
Use new washers or O-rings where you've opened a joint. Grease O-rings with silicone grease only. Pentair and Clack both warn against petroleum jelly and other hydrocarbon-based lubricants on their valves. Fleck's manual also warns against lead-based solder; keep torch heat away from plastic fittings, or do the soldering before you attach the softener.
4. Start it up properly
Open the main, then open the softener's inlet side only slightly so the tank fills slowly and pushes out air. A rush of water into a tank full of air can shake the resin bed and push it around. Our water softener startup procedure walks through the full sequence, including purging air through the drain.
5. Regenerate and test
Run a manual regeneration so the resin gets a full, correct backwash and brine. A bed that ran backwards for a while may be loose and unevenly charged. Test the water at a cold tap after the cycle and again a day later. If it's still not soft after two regenerations in the right direction, look at settings, the injector, or the resin itself.
Mark the flow direction before you cut pipe
On the next install, draw an arrow on the main with a permanent marker before you cut anything, pointing away from the meter or pressure tank. Set the softener where it will live, attach the bypass, and match its arrows to your marks before you tighten anything. If you're replacing an old unit, ignore how it was piped; it may have been wrong for years. Our list of common water softener installation mistakes covers this along with drain, overflow and bypass errors.
FAQ
Which side of a water softener is the inlet?
There's no universal side. Look for "IN" and "OUT" markings or flow arrows on the control valve or bypass valve. The inlet is whichever port the arrows point into, and it must connect to the pipe coming from your water meter or well pressure tank.
Will a backwards water softener still soften water?
Usually not well. Water flowing the wrong way lifts the resin bed and channels past the beads, so you get hard or partly softened water, and regeneration often doesn't work properly either.
Can a softener plumbed backwards damage the resin?
A short run rarely does if the distributor and basket strainers are intact. If resin beads show up in aerators, screens or the toilet tank, resin has escaped and the tank may need to be inspected and rebedded.
Can I just flip the bypass valve to fix reversed plumbing?
No. The bypass is directional too, so flipping it leaves its markings out of step with the control valve. Swap the supply and house connections instead, either by crossing flexible connectors or re-piping the loop.
Do I need to regenerate after fixing reversed plumbing?
Yes. Run a full manual regeneration after the startup procedure so the bed gets a proper backwash, brine draw and rinse in the right direction, then test the water at a cold tap.
Water softener plumbed backwards? Swap it, then regenerate
A water softener plumbed backwards is a five-minute diagnosis and usually an afternoon fix. Match the valve's arrows to the supply line, swap the connections with the system depressurized, start it up slowly, and run a full regeneration. Then test the water and check the aerators for beads, and you'll know whether the resin came through it unharmed.